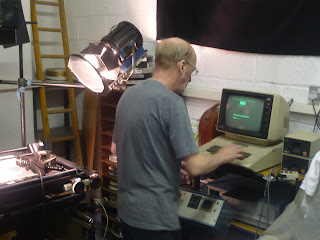
The rostrum comprised a motion picture camera pointing down at a table onto which the artwork could be placed and held flat under a hinged sheet of glass. The artwork could be panned incrementally to the left or right, up or down, and in rotation, and the camera could slide up or down, away or towards, the artwork to create a zoom effect.
 |
| Some of the cameras modified for rostrum work date back to the Hollywood of the 1930s, or even earlier. The mechanisms were so beautifully and solidly crafted that they still run smoothly today. |
For 70 or 80 years this method of photographing animation artwork remained essentially the same, with a few developments along the way: for example, multiplane levels to create depth, or polarising filters to eradicate the appearance of dust and dirt on the cel artwork, or the introduction of early computer technology to control the incremental movements of the camera and artwork table (much like the 'motion control' technology developed for the original Star Wars).
 |
| John Leatherbarrow programming a camera move. Although the computer is ancient, and probably less powerful than your average modern wristwatch, it still does the job! |
So far as I'm concerned John was, and is, the best in the business. He's worked on a huge variety of projects, starting out by photographing Terry Gilliam's animated title sequence for 'Cry of the Banshee', followed by hundreds, if not thousands, of television and film commercials, as well as supervising all the rostrum camera work on Who Framed Roger Rabbit where he helped Richard Williams and Chris Knott develop the 'tone matte' technique which created the effect of 3-dimensional shadows on the 2-dimensional character artwork. John also created many of the painterly lighting effects used in Richard Williams' The Thief and the Cobbler, and it was this use of lighting that particularly interested me for The Last Belle.
 |
| John Leatherbarrow and Neil Boyle. |
One of my early ideas for The Last Belle was to 'colour code' each of the locations in the film (inspired by the tinting of black and white silent movies) so that as we cross-cut between the various locations it is instantly recognisable where we are. The traditional way of doing this would be to create these colour effects in the artwork itself so that, for example, a night-time location would be painted using blacks and blues, and the character cels would be painted in the blue range as well, creating the effect of everything being lit by inky blue moonlight. What I wanted to do was the opposite: paint the whole film in the standard 'neutral' colours of flat daylight, and use John's expertise to really light this artwork and create the correct tonal feel.
As an example, here's the artwork for one of our shots:
 |
| This is a piece of panning background artwork, drawn by Mark Naisbitt and painted by me, using daylight colours. |
 |
| Here's a wheelie-bin colour model, also painted in daylight colours. |
 |
| This is the final effect after John has lit the artwork: stylised moonlight! |
By re-exposing the film in several passes, different effects can be built up. The above example is a fairly simple two-run pass, with the film exposed once with blue lighting to achieve the overall effect, and then once again with mattes to burn in the yellow/orange glow of the basement windows. Using this technique, with each run of the film different colour gels can be used on the lights and/or the camera lens, different exposures can be used to create bright or dark areas within the frame, and various filters can be used to create a variety of effects, for example a diffusion filter to create a soft-edged glow around a bright area. Building up a photographic image this way is truly 'painting with light'; the real magic of it for me is that the final effect on screen can be so different to the actual artwork you hold in your hand - an image of a place that exists only in the emulsion of the film.


This is an awesome read. Thanks for sharing your process.
ReplyDelete--Nick
Neil -
ReplyDeleteI am so eager to see your film, "The Last Belle". Thank you for sharing the production process on this blog and shining the spotlight on such brilliant artisans as John Leatherbarrow and Roy Naisbitt , among others.